
Suicide Squad Movie
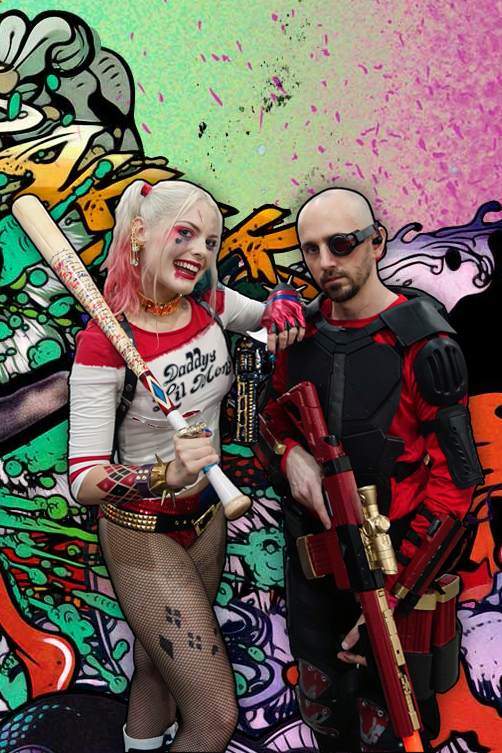
Have you seen the Suicide Squad movie? Will Smith portrays the character of Deadsdshot, an assassin who never misses. His costume features the iconic eyepiece and black and red body armour. He is part of a group of criminals coerced into performing missions for the government in exchange for reduced sentences.

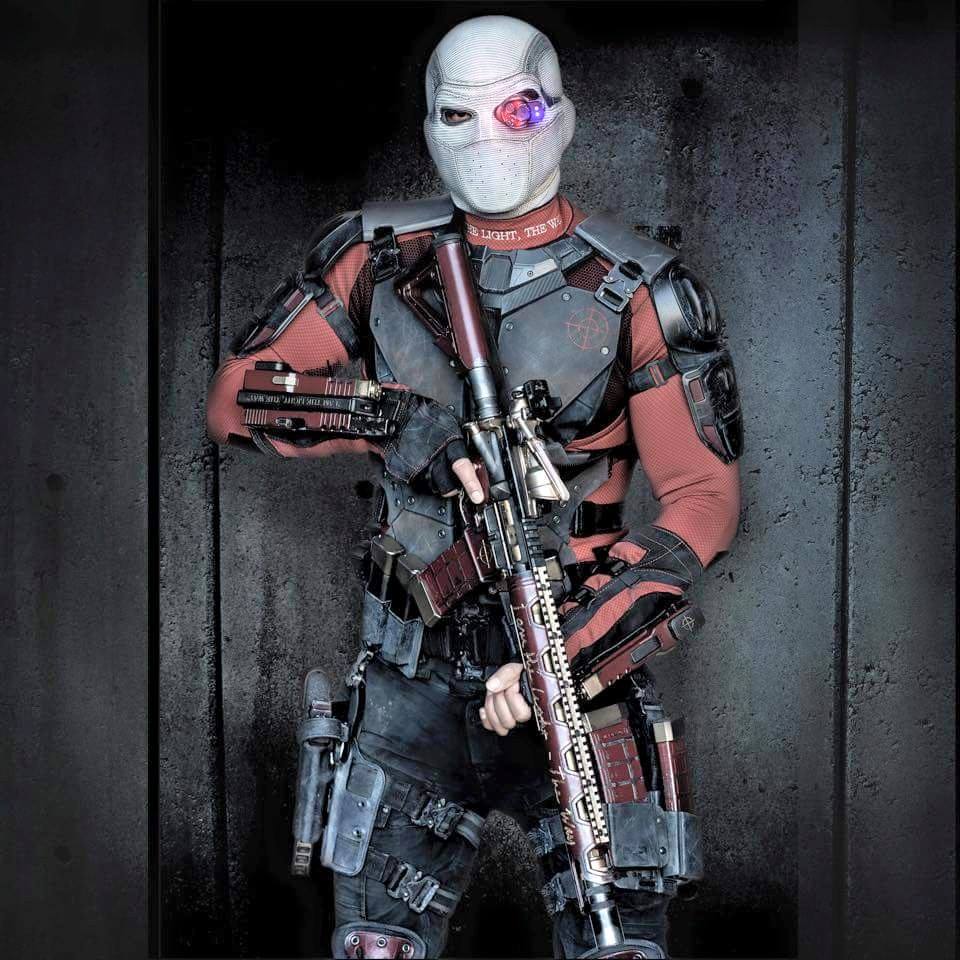


Suicide Squad Deadshot Cosplay
I cosplayed as “Deadsuit” at the Sydney Oz Comic-Con in September 2016, having only decided at the last minute to go, so all I had time for was to paint a Nerf blaster, buy a cheap (and horribly crappy) Deadshot mask and don some red and black coloured formalwear.


So I decided I might as well continue crafting and create the rest of Deadshot’s outfit. I ran out of time so had to cut a few corners (eg small soccer shin pads used for upper arm pads), but overall I felt it was complete enough to attend a convention. Here are a few shots;


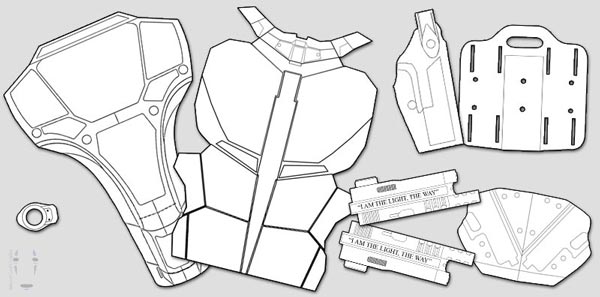
Suicide Squad Deadshot Cosplay Designs and Templates
I created the templates from a ton of reference shots of movie stills, actual screen worn props, and some highly detailed toy figures. The templates aren’t 100% accurate but to quote a famous Australian movie – “That’ll do pig. That’ll do.”
If you use my templates or some of my build log info, please give me a shoutout/link back. And show me your creation – I’m keen to see!
Download Deadshot Templates for Cosplay for $1AUD
If the download does not work in Google Chrome, right click and select “Save link as…”

Also includes 3D print files:
- Basic RMR sight for custom Glock 17 sidearm
- Toy Glock 17 gl shooter slider for custom Glock 17 sidearm
- Compensator for custom Glock 17 sidearm
- Arm gun compensator
- Arm gun tip thingo

Both the RMR sight and the slider are not 100% accurate, nor are they functional in any way. But I think they are good enough for cosplay use. The slider is designed for a cheap toy Glock 17 gel ball shooter from China, though you’ll need to do some cutting and thus render the gel ball shooter non-functional. The slider is in 2 pieces because for my printer it gives the best results for the hexagonal design (print on it’s side, with supports). There are hollowed out sections to minimise what you need to cut off the gel ball shooter, to speed build time. If glued together strongly enough, the slider should just snap on. Both the RMR sight and the slider have 2 small holes that you can stick something into (eg piece of a wooden skewer) for alignment.
I have also included a “solid” single piece slider 3D file. This will require you to cut off a lot more from the toy Glock 17.
I created the arm gun compensator and gun tip thingo (what’s it called?) 3D print files because of it’s vulnerable position – it kept getting knocked either by myself or passersby. Note it only fits the size of the foam I used for my arm guns.
 Instagram: www.instagram.com/almost.cool.cosplay/
Facebook: www.facebook.com/almostcoolcosplay/
Deviant Art: callianis.deviantart.com
General Construction and Material Notes
Note these templates are not to scale. You’ll need to scale them to fit your body and other props. How? Well I super imposed the armour upon myself in Photoshop. I stood against a white door that I’d marked measurements on.
For reference for the wrist guns; they are based on a Glock 19 handgun. Glock 19s are about 187mm/7.36in. tip to handle end, not including the compensator.
As with the other templates, you’ll cut out the main template, trace it onto the foam, then cut off each component, and trace those onto the foam, and so on (see second photo below for example).
EVA Foam
There were 3 types of foam used in this outfit;
- A roll of cheap EVA foam (garage floor mat) that was checkerplated on one side. This placed the armour at about 5mm thick on the thinner parts and 7mm if you included the checkerplate bumps. This was used for the underlay of the body armour, shoulder pads, and thigh rigs. You could get the higher quality EVA form from a cosplay supplier if you want – it will be denser and have less imperfections.
- Camp mat foam form (comes in a 4 pack of interlocking tiles), approx 9mm thick.
- 2mm craft foam used in a couple of spots like the arm guns and shoulder cups as well as the eyepiece.
Buckles and Webbing
4x 25mm clips for the thigh rigs (leg portion)
2x 50mm clips for the thigh rigs (attach to belt)
2x clips for the top front of the armour. These were metal and while mostly somewhat correct in shape, they are wrong in size
Note the use of elastic is used in conjunction with nylon webbing on part of the thigh rigs (ie on the thigh) and the arm guns. This will help keep them in place, ESPECIALLY the arm guns.
 I couldn’t find a match for Deadshot’s paded tactical belt that all of his equipment (guns, mags), so I got a cheap “padded tactical belt” from eBay. Note how the back is taller than the rest of the belt.
The twin Glock back holster actually has velcro glued onto the back, and I made some velcrop loops to attach to the molle on the back of the tactical belt.
Note I flipped the belt upside down to match Deadshot.
Painting
In the movie the front and back body armour underlay is actually a padded or layered stitched fabric. So when I used the cheap EVA foam I left it unpainted. This is one less thing to worry about in terms of wear and tea of paint. I just hit it with a heat gun to seal it.
I wanted a matt black for the other foam parts (which unfortunately were a pretty blue instead of black, otherwise I might have left them unpainted too) so I used a peel-able black rubber automotive spray paint. I went with this because I’m a noob, I was time poor, and I needed a paint that would remain flexible. In high-friction areas like the middle of the collar piece, this paint can rub off. Fortunately after 4 outings and 2 flights this is the only part that has worn and I just resprayed it. This rubber paint was used on the front and back body armour plates, shoulders and arms.. The foam was sealed with some heat and PVA glue.
Body Armour – Front
I had the most trouble getting the collar piece just right, since it has a lot of clean angles. In the end I cut it up into 6 pieces (see 4th photo below).
The “rivets” on the armour plates were made with a rotary tool with the sanding drum poking out off the stem a little. The screw head helped with a middle bevel.


Body Armour – Back
2mm craft foam was used for the accents on the back armour. The texture on this in the movie seems a little carbon-like so given my time limit I merely scored a series of parallel lines and hit it with the heat gun.
Nylon webbing was simply glued on. Note in the photo below there is a bead of hot glue to help reinforce high stress points. Thanks to Bill Doran’s from Punished Props for that tip.
The back plate is contoured to fit the wearer’s shoulders and spine. My upper spine is more rounded than the average Joe so I had to account for that. I cut some V grooves to aid in the bending, and used hot glue in those grooves.


Eyepiece
Not a lot of photos for this portion as this is where I was running out of time. The ear piece in the movie is actually a Motorola S9 bluetooth headset, obviously with one earpiece cut off. You can get a cheap knock off from eBay or Aliexpress.
The components used in this eyepiece;
- That ever present checkerplate EVA foam with the pattern sanded off. This was the round padding you can see in the first 2 photos. This was sanded, heat sealed, and left as is.
- 2mm craft form (3rd photo).
- Camp mat foam, glued into about 3 or 4 layers and carved to an approximate shape (use movie reference photos).
- 1 arm from some old sunglasses, that I glued a strip of carved foam onto.
- Some flat plastic, I used old membership cards (ie what your credit card is made from).
- The red plastic was actually from a protein powder container.
With the exception of the black eyecup padding form, the rest was primed and painted in a matt black (with 1 plastic tab being silver), and “weathered” with a silver paint pen (smeared in places with my finger).
This eye piece is like wearing 1 half of those red and blue 3D glasses. It makes things look weird.


Arms and Shoulder Pads
Definitely was out of time (and sleep) by this point. This was a difficult piece to shape and I just had to go with what I could make in the time I had left. It is an approximation of the shoulder cup design using garage mat EVA for the outside, camp mat EVA for the inner part, and some 2mm craft foam to cover up the slits. Heat sealed then sprayed with rubber paint (no primer). I used velcro to attach this to the shoulder flap and upper arm piece.


Arm Guns
This is mostly 2 layers of camp mat foam glued together, with some craft foam for the accents. I had to go with a “good enough” result here. The gun isn’t quite as accurate or contoured as I wanted, but I didn’t have time for more detail (or even the slogan).
I would have bought black camp tiles but they weren’t in stock at the time. Whenever this gun got knocked about (it was a magnet for people at cons) it would reveal the blue underneath, despite the grey primer, and silver paint as the undercoat. I just carried a silver paint pen in my pocket for touch ups – this worked to make the guns look more weathered anyway. In retrospect I would have used black foam, then primer, silver, matt clearcoat, coloured overcoats, your choice of weathering followed by another matt clearcoat to seal it all in.
My first convention I just attached 3 straps (15mm) with some elastic to help keep it on my arm. I wished I had time to make the actual arm covers/bracers that the guns are attached to. After the con I did a minor upgrade by attaching them to some children’s soccer shin pads I’d painted black.


The Other Guns
Deadshot Rifle

Australia has very strict gun laws, and given time and budget I did not try to source an AR15/M4 rifle. I just cobbled this rifle together from a few different Nerf blaster pieces;
Base/receiver: Nerf Recon CS-6 (could also use the Retaliator)
Scope: Nerf Zombie Clearshot Blaster
Stock: Nerf Retaliator, but I suggest the stock from the Nerf Raider
Barrel: Nerf Longstrike
Front Grip: Nerf Retaliator
Deadshot Hand Guns
As mentioned elsewhere, the 3 handguns are Glock 17s. The back 2 appear stock standard. The sidearm is a heavily customised Glock 17 using parts from ZEV Technologies, with paint job, slider, compensator, clip basepad, Trijicon RMR reflex red dot sight and textured grip. The mags have golden Firepower basepads.
I bought a gel ball shooter from china and after some hacking and 3D printing, was able to come up with a reasonable version of the custom Glock sidearm. Completely non-functional, and con safe. The magwell and magazine basepad are modified 3D files from another creator, so I have not included these files in my templates. Note the photos show “version 1” of the slider, before I realised I had the wrong number of hexagonal holes and hole ridges.


Legs – Thigh Rigs
Just garage floor mat foam, several thick layers of PVA, and hot glue went into the construction of these. You’ll need to make 2 of these base plates. I cut V grooves to aid in the bending.
I coated these in several layers of PVA glue to seal and stiffen. I did not paint them as it was not necessary. Deadshot’s gear is extremely beat up and worn so the stretched/scratched/dented PVA surface was more than appropriate.
Or if you’ve got time you can just go out and buy yourself a Safariland 6004 holster as that is what Deadshot was using (has a custom Cobra buckle). You can get clones from AliExpress. You’ll need 2 of the baseplates – the other one is for the AR15 3 Clip Magpul.


Deadshot’s sidearm is a fully custom Glock G17 featuring ZEV technologies components.
For the holster I’ve since created a better design (included in the template files).


Legs – Knee Pads
These are customised Xtak 100 knee pads. By “custom” all is really is are sawn off elbow pads attached to the knee pads 😉 You can get a cheap version of this from eBay or AliExpress. My my pads I accudentally used the wrong half of the elbow pads but I doubt anyone will notice. Yes, you’ll need a set of knee and elbow pads and take them to the chop shop. If you’ve got a rivet gun, then that’ll be cool. I didn’t so I used a couple of small bolts with washer to join these 2 up.
The painting: Grey primer, then toothpaste where I didn’t want the red to go (you could use something else like mustard), then the red over the top. Once dry, wipe off the toothpaste/mustard to reveal the weathering. Thanks to the awesome A.K. Wirru for this time. I then used a silver paint pen on the rivets and gave it a bit of a black wash (which also gave it a glossy sheen). Keep in mind that all of Deadshot’s gear is extremely well worn.


Back Holster
Deadshot’s back hoslter is a custom Kydex so you probably won’t be able to buy one. I used a rear shot of Deadshot to form the basic shape but once I formed the foam over the guns it changed the shape. So keep that in mind – use the template for the backplate not the foam/material you form over the top. Deadshot’s but guns are Glock G17s.


Upgrades/What Would I Do Differently
Now that con-pressure is off, I have some time to think about upgrades or how I might have gone about building things differently. Here is what I came up with:
Doing it Different
- Black camping mat foam would have been a better choice than bright blue, especially if paint gets chipped off
- Higher quality EVA foam without the checkerplate would have sped up the fabrication and made the “behind the scenes” sections neater
- Arm guns: Matt clearcoats after base colour and after weathering, to help seal and protect. Use acrylic paint instead of enamel, as it has greater flexibility.
- The black rubber paint isn’t durable in high wear places, especially for the collar piece. I’d like to perhaps use more durable and flexible acrylic. Or perhaps black foam won’t need painting at all. This would then allow me to use the rifle strap that Deadshot has (would cause wear and tear on the back, front and shoulder armour)
Considered Upgrades
- Guns:
- Now that I have 3 Glock 17 toy guns I could revisit the 2 holsters (back holster, leg holster) as well as see if I can make something resembling his custom Glock sidearm (have already designed and upgraded the gun with RMR sight, slider, magwell, magazine basepads)
- There is (or was, can’t find the seller) a Deadshot Nerf rifle upgrade that would be cool. Or I now have an M4 I could customise
- I could make more accurate (and durable) arm guns, and finish the slogan
- I’ve already upgraded the arm guns to include a base plate, however Deadshot has fabric arm wraps for his arm guns. These would be cool to have. They extend to cover the back of his hand and wrap around the palm
- Make his actual mask! What better way to spend the day than with 30% vision and a sweaty head?
- Glock mags and mag holders. I totally didn’t get time to even think about making them. In their place I had 2 black leather phone holders (one for my phone, one for my cos-cards)
I’ve invested a lot of time into making this costume and I actually don’t feel compelled to spend much more time on it. I might make new holsters, maybe paint a Glock G17, and maaaayybe made some arm braces, but that’s about it.
So, hope this helped. If you use my templates or some of my build log info, please give me a shoutout/link back. And show me your creation – I’m keen to see!
Did you like my tutorial? Buy me a tasty coffee 🙂
Instagram: www.instagram.com/almost.cool.cosplay/
Facebook: www.facebook.com/almostcoolcosplay/
Deviant Art: callianis.deviantart.com